Plant propagation from cuttings is one of the oldest and most widely practiced methods of multiplying plants, allowing gardeners to create genetically identical copies of a parent plant. This technique involves removing a portion of stem, leaf, or root from a healthy plant and encouraging it to develop its own root system. It is a cost-effective way to expand a garden collection without purchasing new plants, and it preserves the exact characteristics of the parent.
As a plant process, rooting from cuttings relies on the remarkable ability of plant cells to regenerate and form new tissues. Specialized cells called meristematic cells, found in nodes and cambium layers of stems, are capable of differentiating into root cells under the right conditions. This cellular flexibility is what makes cutting propagation possible across such a wide range of plant species.
There are several types of cuttings used in propagation, each suited to different plants and seasons. Softwood cuttings are taken from young, flexible new growth in spring and early summer. Semi-hardwood cuttings come from partially matured stems in mid to late summer, while hardwood cuttings are taken from fully dormant, woody stems during winter.
The success of cuttings depends heavily on environmental conditions, including humidity, temperature, and light levels during the rooting period. Most cuttings root best in warm, humid conditions with indirect light, which reduces moisture loss while encouraging root development. A consistent environment during this critical period greatly improves success rates.
Rooting hormones, available in powder, gel, or liquid form, are commonly used to speed up and improve root development in cuttings. These products contain synthetic auxins that mimic natural plant hormones responsible for triggering root growth. While not always necessary, rooting hormones can significantly increase success rates, particularly with difficult-to-root species.
Once rooted, cuttings need a careful transition period before being exposed to full outdoor conditions. This process, known as hardening off, involves gradually increasing light exposure and reducing humidity over one to two weeks. Skipping this transition can cause newly rooted cuttings to wilt or fail even after successful rooting.
Propagation from cuttings is used extensively in horticulture, agriculture, and commercial plant production worldwide. It allows growers to rapidly produce large numbers of uniform plants while preserving desirable traits such as flower color, growth habit, and disease resistance. For home gardeners, it remains one of the most satisfying and rewarding skills to master.
Also Read: How To Grow Snowdrop From Seeds
How to Propagate Plants From Cuttings
- Select a Healthy Parent Plant: The best cuttings come from vigorous, disease-free parent plants that are actively growing. Avoid taking cuttings from plants showing signs of stress, pest damage, or disease. A strong parent plant gives cuttings the best possible start.
- Choose the Right Type of Cutting: Match the cutting type to the plant and season, using softwood cuttings in spring, semi-hardwood in late summer, and hardwood in winter. Different plants root best from different cutting types. Researching the specific plant beforehand helps maximize success rates.
- Use Clean, Sharp Tools: Always use sharp, sterilized pruning shears or a knife to make clean cuts. Blunt or dirty tools can crush stem tissue and introduce disease, reducing rooting success. Wiping blades with rubbing alcohol between cuts prevents cross-contamination.
- Cut at the Right Length: Most cuttings should be 4 to 6 inches long, with at least two or three nodes along the stem. A node is the point on a stem where leaves attach, and it is from here that roots will emerge. Cutting just below a node gives the best rooting potential.
- Remove Lower Leaves: Strip away leaves from the lower half of the cutting to expose the nodes that will be buried in the growing medium. Leaves left below the soil surface can rot and introduce fungal disease. Only a few healthy leaves should remain at the top.
- Apply Rooting Hormone: Dip the cut end of the stem into rooting hormone powder, gel, or liquid before inserting it into the growing medium. This encourages faster and more reliable root development, especially in harder-to-root species. Tap off any excess powder to avoid over-application.
- Prepare a Suitable Rooting Medium: A well-draining mix of perlite, vermiculite, or coarse sand provides ideal conditions for root development. Standard potting soil is often too dense and moisture-retentive for cuttings. The medium should hold some moisture while allowing good aeration around the developing roots.
- Insert Cuttings into the Medium: Make a small hole in the rooting medium with a pencil or stick before inserting the cutting. Pushing cuttings directly into the medium can scrape off rooting hormone and damage the stem. Firm the medium gently around the cutting to ensure good contact.
- Maintain High Humidity: Enclosing cuttings in a clear plastic bag or placing a plastic dome over the container creates the humid environment needed for successful rooting. This reduces moisture loss from the leaves before roots are established. The covering should be removed periodically to allow brief air circulation.
- Place in Bright Indirect Light: Cuttings need light for photosynthesis but should be shielded from direct sun, which can cause wilting and overheating. A bright windowsill or a position under fluorescent grow lights works well. Too little light slows rooting, while too much causes stress.
- Maintain Consistent Warmth: Most cuttings root most reliably at temperatures between 65 and 75 degrees Fahrenheit (18 to 24 degrees Celsius). A heat mat placed beneath the containers can provide steady bottom warmth. Fluctuating temperatures can slow or prevent rooting.
- Water Carefully and Consistently: The rooting medium should be kept evenly moist but never soggy during the rooting period. Overwatering is one of the most common causes of cutting failure, leading to stem rot. A light misting rather than heavy watering is often the safest approach.
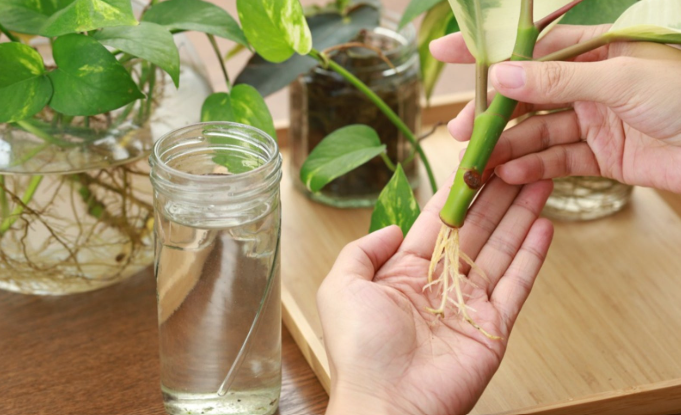
- Check for Root Development: After two to four weeks, gently tug the cutting to feel for resistance, which indicates roots are forming. Alternatively, a small root may be visible emerging from the drainage hole of the container. Avoid checking too frequently, as disturbing cuttings can interrupt rooting.
- Harden Off Rooted Cuttings: Once roots are established, gradually expose plants to outdoor conditions over one to two weeks. Start by removing the humidity cover for short periods and increasing exposure daily. This transition prevents transplant shock when plants are moved to their final location.
- Transplant into Larger Containers or Garden Beds: Once hardened off and showing strong new growth, rooted cuttings can be moved into individual pots or prepared garden beds. Handle roots gently during transplanting to avoid damage. Water thoroughly after transplanting to help roots settle into their new environment.
- Label and Record Your Cuttings: Keeping records of cutting dates, plant varieties, and rooting methods helps refine techniques over time. Labeling containers prevents confusion when managing multiple cuttings at once. This simple habit is especially useful when experimenting with less common or difficult-to-root species.
Also Read: Plants That Grow Easily From Cutting