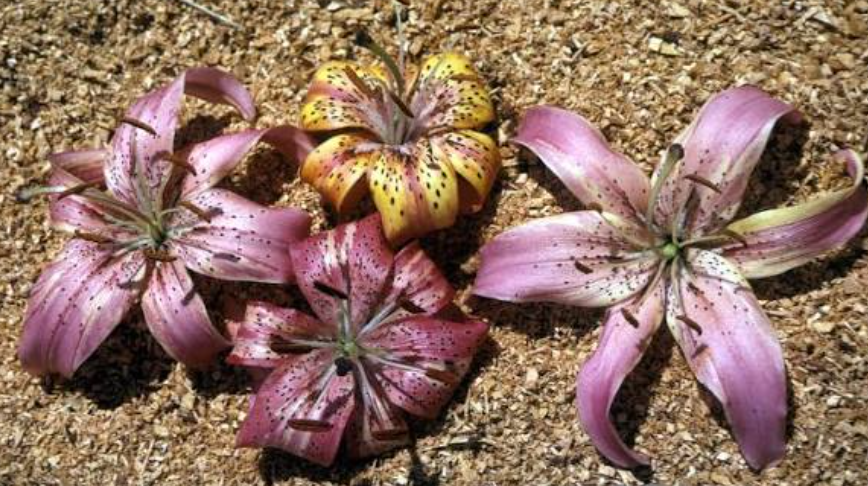
Lilies are treasured for their tall, elegant stems and large, fragrant, trumpet-shaped blooms that bring a striking vertical presence to garden beds and cut flower arrangements alike. Belonging to the genus Lilium, true lilies grow from scaly bulbs and include a wide range of types, such as Asiatic, Oriental, Trumpet, and Easter lilies, each offering distinct bloom times, fragrance levels, and flower forms. While lilies have earned a reputation as elegant, relatively low-fuss perennials that return reliably year after year, gardeners who grow them season after season inevitably encounter Common Lily Plant Problems, from fungal disease and bulb rot to the notoriously destructive lily leaf beetle.
Lilies are generally grouped by hybrid classification, with Asiatic lilies prized for their early bloom time and wide color range, Oriental lilies known for their intense fragrance and large, often pink or white blooms, and Trumpet lilies valued for their tall, dramatic, trumpet-shaped flowers that bloom later in the season. Easter lilies, commonly grown as potted gifts, are a type of Trumpet lily typically forced to bloom around the spring holiday before being planted outdoors in milder climates. Knowing which class of lily is being grown helps set expectations for bloom time, height, and specific care needs, since these hybrid groups can vary meaningfully in their tolerance for cold, sun, and soil conditions.
Successful lily cultivation depends on well-draining soil, adequate sunlight, and proper planting depth, since lily bulbs are particularly vulnerable to rot in soil that stays consistently wet. Most lilies prefer a location with full sun to light afternoon shade, ideally with their roots kept cool and shaded by surrounding plants or mulch while their flowering stems reach upward into the sun. Bulbs are typically planted in autumn or early spring at a depth of about three times their height, and because lily bulbs lack the protective papery covering found on bulbs like tulips or daffodils, they are especially prone to drying out if left exposed or improperly stored before planting. Consistent moisture during the growing season, without allowing the soil to become waterlogged, supports strong stem growth and a full, healthy bloom.
Despite their reputation for elegance and resilience, lilies face a range of challenges from insect pests, fungal and viral diseases, and environmental stress that can significantly affect their growth and flowering. Because lily bulbs remain in the ground for multiple years and often form dense clumps over time, problems can persist and worsen if not identified and addressed promptly. This guide covers twenty-eight of the most common issues lily growers encounter, describing the symptoms to watch for and the practical fixes that can help restore a struggling plant to full, healthy bloom.
Common Lily Plant Problems
1. Lily Leaf Beetle
Lily leaf beetles are bright red insects that feed voraciously on lily foliage, stems, and buds, with both adults and their dark, slug-like larvae capable of stripping a plant down to bare stems in a short period. Damage often appears as ragged holes in leaves, chewed buds, and in severe cases, complete defoliation. Handpicking adult beetles and larvae off the plant regularly, particularly in early spring when adults first emerge, helps keep populations manageable. Applying an insecticide labeled for lily leaf beetle, along with checking the undersides of leaves for the beetle’s distinctive orange egg clusters and removing them, provides more thorough control.
2. Botrytis Blight (Lily Fire)
Botrytis blight, often called lily fire, causes reddish-brown spots on leaves and flowers that can quickly merge into larger blighted patches, particularly during cool, wet, or humid weather. Severely affected buds may fail to open, and flowers can become distorted or covered in a grayish fungal growth. Removing and destroying infected plant material promptly helps prevent the fungus from spreading to healthy tissue. Improving air circulation through proper spacing and avoiding overhead watering, along with applying a fungicide during humid periods, helps keep botrytis blight under control.
3. Basal Rot
Basal rot causes the base of the lily bulb to become soft, brown, and mushy, often preventing the bulb from producing healthy shoots or causing emerging stems to yellow and collapse. This fungal disease tends to be more severe in poorly draining soil or when bulbs are planted in previously infected ground. Inspecting bulbs before planting and discarding any that feel soft or discolored helps prevent introducing the disease. Improving soil drainage and avoiding replanting lilies in the same infected location for several years are the most effective long-term preventive measures.
4. Aphids
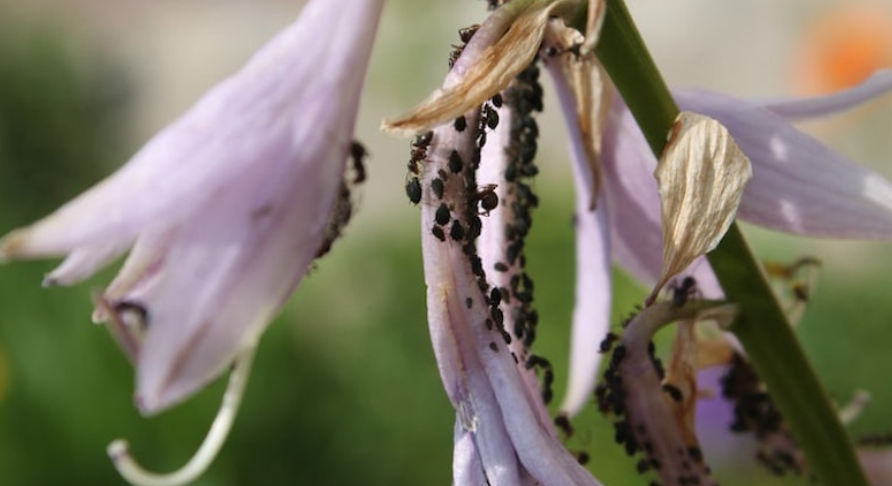
Aphids cluster on lily stems, leaves, and buds, feeding on plant sap and often causing curled or distorted new growth, along with a sticky honeydew residue that can attract sooty mold. Beyond the direct feeding damage, aphids are also known to spread viral diseases between lily plants as they move from one to another. A strong spray of water can dislodge and reduce aphid populations on lightly affected plants, while insecticidal soap offers a more targeted treatment for persistent infestations. Controlling aphids promptly is especially important in lilies given their role in spreading viruses such as lily mosaic virus.
5. Lily Mosaic Virus
Lily mosaic virus causes mottled, streaked, or mosaic-like patterns on the leaves, along with potential stunting and distorted flower development, though symptoms can sometimes be subtle depending on the lily variety. This virus is most commonly spread by aphids feeding on infected plants before moving to healthy ones, making aphid control an important preventive measure. There is no cure for lily mosaic virus once a plant is infected, so removing and destroying affected bulbs is generally recommended to prevent further spread. Purchasing certified virus-free bulbs from reputable sources helps avoid introducing the virus to the garden in the first place.
6. Botrytis Leaf Spot
Distinct from full botrytis blight, botrytis leaf spot presents as smaller, scattered brown or tan lesions on lily leaves that may have a slightly water-soaked appearance before drying out. This condition tends to develop during periods of high humidity combined with limited air circulation around the plant. Removing affected leaves and improving spacing between plants for better airflow helps reduce the spread of the fungus. Watering at the soil level rather than overhead further limits the moisture that encourages leaf spot to develop.
7. Red Lily Beetle Larvae Damage
While closely related to the adult lily leaf beetle problem, the larvae of this pest cause distinct damage, covering themselves in their own excrement as camouflage while feeding heavily on the undersides of leaves, often skeletonizing foliage from below. This disguise makes the larvae easy to overlook during casual inspection, allowing damage to progress significantly before being noticed. Checking the undersides of leaves closely, rather than relying on surface appearance alone, helps catch larvae before they cause extensive damage. Removing larvae by hand or applying an appropriate insecticide targeted at the larval stage helps bring the infestation under control.
8. Bulb Rot (General)
Beyond basal rot specifically, lily bulbs can suffer from various forms of general bulb rot caused by different fungal and bacterial pathogens, typically resulting in soft, discolored, foul-smelling bulb tissue and a failure to produce healthy growth. This is most often linked to bulbs sitting in overly wet or poorly draining soil for extended periods. Improving drainage in the planting area, whether through soil amendment or planting in raised beds, is the most important preventive step. Discarding any bulbs that show signs of softness or discoloration before planting further reduces the risk of introducing rot to the garden.
9. Spider Mites
Spider mites cause fine stippling and yellowing on lily leaves, along with delicate webbing visible on the undersides of foliage, particularly during hot, dry weather conditions. Left untreated, heavy infestations can significantly weaken the plant and reduce its ability to support healthy blooms. Regularly hosing down the foliage, especially the undersides of leaves, helps disrupt mite populations before they become severe. Applying insecticidal soap or a miticide according to label instructions offers effective treatment for more established infestations.
10. Slugs and Snails
Slugs and snails feed on tender lily shoots and leaves, particularly in early spring, leaving behind irregular holes and a telltale slime trail across affected foliage and the surrounding soil. Damage tends to be most severe during cool, damp weather when these pests are most active and lily shoots are still tender. Removing garden debris and mulch that provides daytime shelter for slugs and snails helps reduce their populations near lily plantings. Using barriers such as diatomaceous earth or copper tape, or applying an appropriate slug bait, provides additional protection for vulnerable young shoots.
11. Bud Blast
Bud blast in lilies refers to flower buds that dry up, shrivel, or fail to open properly, often caused by insufficient moisture, sudden temperature fluctuations, or root stress during bud development. This problem can be particularly disappointing since the plant may otherwise appear healthy right up until the buds fail to open. Maintaining consistent soil moisture throughout the growing season, especially as flower buds are forming, helps prevent bud blast from developing. Protecting plants from sudden temperature swings and minimizing root disturbance during this critical period further supports healthy bud development.
12. Fusarium Bulb Rot
Fusarium bulb rot causes lily bulbs to develop a dry, brown rot, often starting at the base and spreading upward through the bulb tissue, sometimes accompanied by a distinctive musty odor. Affected plants typically show stunted, yellowing growth or fail to emerge from the soil altogether. Inspecting bulbs before planting and discarding any with soft spots, discoloration, or an unusual smell helps prevent introducing the fungus to the garden. Storing bulbs in a cool, dry, well-ventilated location and handling them carefully to avoid surface damage further reduces the risk of infection.
13. Leaf Scorch
Leaf scorch in lilies appears as browning, crisping tissue along the edges or tips of leaves, often caused by a combination of intense sun exposure and insufficient soil moisture, particularly during hot summer weather. This condition can also develop from fertilizer applied too heavily or too close to the base of the plant. Maintaining consistent watering during dry, hot periods helps prevent moisture-related leaf scorch. Applying fertilizer at recommended rates and watering it in thoroughly after application reduces the risk of scorch caused by fertilizer burn.
14. Chlorosis
Chlorosis in lilies presents as yellowing leaves with green veins, typically the result of an iron deficiency linked to soil that is too alkaline for the plant to properly access available nutrients. This condition tends to be more common in lilies grown in regions with naturally alkaline soil or where hard water is used for irrigation. Testing soil pH and amending it toward a more neutral to slightly acidic range supports better nutrient uptake for the plant. Applying a chelated iron supplement provides a more immediate correction while longer-term soil amendments take effect.
15. Waterlogged Soil
Lily bulbs are particularly sensitive to excess soil moisture, and ground that stays waterlogged for extended periods deprives the bulb of oxygen and creates ideal conditions for rot-causing fungi to take hold. Symptoms include soft, mushy bulbs, yellowing foliage, and stunted or absent growth despite otherwise favorable conditions. Amending heavy clay soil with organic matter or coarse sand improves drainage and reduces the risk of waterlogging around the bulbs. Planting lilies in raised beds or on slightly mounded soil in areas with naturally poor drainage offers a more reliable long-term solution.
16. Thrips
Thrips are tiny, slender insects that feed on lily petals and buds, causing streaked, discolored, or distorted blooms that may fail to open fully or develop unevenly. Damage is often most noticeable on light-colored lily varieties, where the silvery streaking and stippling caused by thrips feeding is most visible. Removing and disposing of affected flowers helps reduce the local thrips population before it spreads further. Insecticidal soap or a targeted insecticide applied according to label instructions offers effective control for more significant infestations.
17. Deer and Rabbit Browsing
Deer and rabbits find lily foliage, buds, and flowers highly palatable and can strip a planting down to bare stems in a single visit, particularly in gardens located near wooded or open natural areas. Damage typically appears as ragged, torn leaves and missing buds or flowers, distinct from the cleaner feeding marks left by insect pests. Installing physical barriers such as fencing around vulnerable beds offers the most reliable protection against browsing animals. Applying repellent sprays regularly, especially after rain, and choosing planting locations closer to the house can also help reduce browsing damage.
18. Stem Rot
Stem rot causes the base of the lily stem to become soft, discolored, and weak, sometimes leading the plant to topple over even when the bulb and roots initially appear unaffected. This condition is typically linked to excess soil moisture and poor air circulation around the base of the plant. Improving drainage in the planting area and avoiding mulch piled directly against the stem helps reduce the moist conditions that encourage rot. Removing and destroying any affected plants promptly prevents the responsible pathogens from spreading to neighboring lilies.
19. Nutrient Deficiency
Lilies experiencing nutrient deficiency often display pale or yellowing leaves, weak stems, and smaller than expected blooms, with the specific symptom pattern depending on which nutrient is lacking. A shortage of nitrogen typically causes overall pale foliage, while insufficient potassium may lead to weaker stems and reduced flower quality. Testing the soil before planting helps identify specific deficiencies so they can be corrected with targeted amendments. Applying a balanced, slow-release fertilizer during the growing season, particularly as buds begin to form, supports stronger overall growth and flowering.
20. Overcrowding
Overcrowded lily plantings, where bulbs have been left in place for several years without division, often result in progressively smaller flowers, reduced blooming, and increased competition for nutrients and water among the growing clump. This gradual decline in performance can be mistaken for disease when it is really a matter of bulbs needing more room to grow. Digging up and dividing bulb clusters every three to four years, spacing them appropriately when replanting, restores vigor to the planting. Removing smaller, weaker offset bulbs and focusing on the largest, healthiest bulbs also improves overall bloom quality going forward.
21. Improper Planting Depth
Lily bulbs planted too shallow are more vulnerable to temperature swings, drying out, and toppling over once they flower, while bulbs planted too deep may struggle to emerge or produce weak, delayed growth. Symptoms of improper depth include bulbs becoming exposed at the soil surface over time or shoots that take unusually long to appear in spring. Planting bulbs at a depth of roughly three times their height, measured from the base of the bulb, generally provides the right balance of protection and ease of emergence. Adding a layer of mulch after planting helps regulate soil temperature and further protects bulbs planted at the correct depth.
22. Rust
Lily rust causes small, orange to rust-colored pustules to develop on the undersides of leaves, with corresponding yellow spotting visible on the upper leaf surface. Severely affected leaves may curl, dry out, and drop prematurely, reducing the plant’s overall vigor and energy reserves for the following season. Removing and disposing of infected leaves and plant debris helps limit the spread of fungal spores within the garden. Watering at the soil level rather than overhead, along with ensuring adequate spacing between plants for airflow, helps prevent conditions favorable to rust.
23. Stunted Growth
Stunted growth in lilies can result from a combination of factors, including poor soil quality, insufficient sunlight, root damage from pests or overcrowding, or a bulb that was undersized or of poor quality at planting. Plants exhibiting stunted growth often also show smaller than expected leaves and delayed or reduced flowering compared to healthy neighboring plants. Improving soil fertility and ensuring the planting site receives adequate sunlight addresses many common causes of stunted growth. Dividing overcrowded clumps and starting with high-quality, appropriately sized bulbs further supports vigorous, healthy growth.
24. Fungal Leaf Spot
Fungal leaf spot on lilies presents as small, discolored lesions scattered across the leaf surface, sometimes with a darker border or a slightly sunken appearance where the fungus has damaged the tissue. In humid conditions, these spots can multiply and merge, weakening the overall vigor of the plant. Removing and disposing of affected leaves reduces the amount of fungal material available to spread further. Watering at the soil level rather than overhead, along with ensuring adequate spacing for airflow between plants, helps prevent the moist conditions that fungal leaf spot needs to thrive.
25. Herbicide Damage
Herbicide damage in lilies can occur from drift or improper application nearby, causing symptoms such as twisted, cupped, or distorted leaves, discoloration, and stunted growth that may resemble disease or nutrient deficiency at first glance. This damage is particularly common in gardens located near lawns or agricultural areas where herbicides are applied. Avoiding herbicide application on windy days and maintaining a buffer zone around sensitive lily plantings helps prevent accidental drift damage. If damage does occur, providing extra water and avoiding additional stress on the plant gives it the best chance to recover over time.
26. Frost Damage
Frost damage occurs when a late cold snap strikes lilies after they have already emerged, causing leaves and tender shoots to appear water-soaked, blackened, or mushy in the affected areas. While established bulbs are generally cold-hardy, tender new growth is especially vulnerable to sudden late-season temperature drops. Covering emerging plants with cloth or mulch when a late frost is forecast helps protect them from the worst damage. Allowing damaged foliage to remain on the plant rather than cutting it back immediately gives the lily a better chance to recover and continue growing.
27. Post-Bloom Neglect
Post-bloom neglect refers to cutting back lily foliage too early after flowering, which prevents the plant from photosynthesizing and storing enough energy in the bulb to support strong growth and blooming the following year. Gardeners sometimes mistake the fading, yellowing post-bloom foliage for a problem and remove it prematurely, inadvertently weakening future performance. Allowing the leaves to yellow and die back naturally, typically over several weeks after flowering, ensures the bulb receives adequate energy reserves. Deadheading spent flowers to prevent seed formation, while leaving the foliage intact, strikes the right balance between garden tidiness and long-term bulb health.
28. Viral Decline (General)
Beyond lily mosaic virus specifically, lilies can be affected by several other viral diseases that cause a gradual decline in vigor, including mottled foliage, stunted growth, and progressively smaller or fewer blooms over successive seasons. Because viruses cannot be cured once a plant is infected, prevention and early removal of affected plants are the primary management strategies. Purchasing certified virus-free bulbs from reputable sources significantly reduces the risk of introducing viral disease to the garden. Controlling aphid populations, since they are the primary vector for spreading many lily viruses, and promptly removing any plant showing symptoms of viral decline further protects the rest of the planting.