
The Dwarf Cavendish is one of the most widely recognized and extensively grown banana cultivars in the world, occupying an important position in both commercial agriculture and home horticulture across tropical, subtropical, and even warm temperate regions. It belongs to the AAA genomic group — carrying three sets of chromosomes entirely from Musa acuminata — and is a member of the Cavendish subgroup, the same cultivar cluster that dominates global banana trade. Despite sharing its genomic classification with taller Cavendish types like Williams and Robusta, the Dwarf Cavendish is a genuinely distinct cultivar, selected over generations for its compact stature, wind resistance, and adaptability to a broader range of growing conditions than its taller relatives.
The most defining physical characteristic of the Dwarf Cavendish is its height. Where standard Cavendish varieties reach 3 to 5 metres, the Dwarf Cavendish typically matures at just 1.5 to 2.5 metres, with a stout, robust pseudostem relative to its height that gives it exceptional stability in windy conditions. This compact architecture was not merely a botanical curiosity — it represented a significant practical advantage in exposed coastal and island growing environments, and it is precisely why the Dwarf Cavendish became the dominant commercial variety in the Canary Islands, Madeira, and parts of the Mediterranean long before taller Cavendish clones took over. The shorter stature also makes bunch management, bagging, and harvesting considerably easier without ladders or elevated platforms.
Historically, the Dwarf Cavendish played a pivotal role in the global transition away from the Gros Michel banana following the Panama disease crisis of the 1950s and 1960s. When Fusarium wilt Race 1 devastated Gros Michel plantations worldwide, the banana industry urgently needed a disease-resistant replacement, and the Cavendish subgroup — including the Dwarf Cavendish — proved immune to Race 1. The Dwarf Cavendish had actually been introduced to Europe considerably earlier, arriving in Britain in 1829 when botanist Charles Telfair sent specimens from Mauritius to the Duke of Devonshire’s famous glasshouse at Chatsworth House — giving rise to the name “Cavendish” in honor of the Duke’s family name. That Chatsworth plant became the progenitor of much of the Cavendish banana cultivation that followed across the globe.
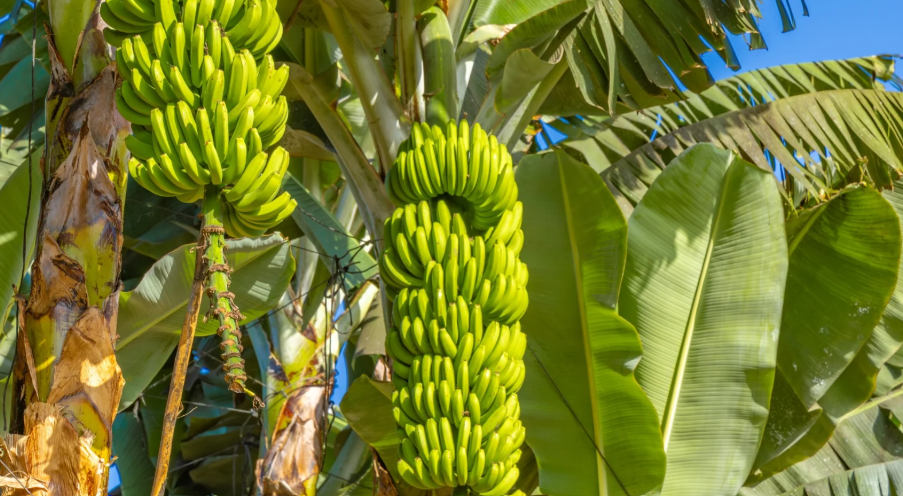
The fruit of the Dwarf Cavendish is essentially identical in flavor and appearance to standard Cavendish bananas — the familiar mild, creamy sweetness and smooth yellow skin that billions of consumers recognize — though some growers and tasters note that home-grown Dwarf Cavendish fruit ripened slowly on the plant can develop a slightly richer, more aromatic flavor than commercially harvested, gas-ripened Cavendish. Bunches are moderately sized, typically carrying 7 to 10 hands with 12 to 20 fingers per hand, for a total bunch weight of 15 to 35 kg under favorable growing conditions. The individual fruits are the standard Cavendish size and shape — 15 to 22 cm long, gently curved, with a smooth skin that transitions from green through yellow to spotted yellow-brown at full ripeness.
The Dwarf Cavendish has found a particularly enthusiastic following among home gardeners in subtropical and warm temperate regions, where its compact size, container-growing potential, and relative cold tolerance make it the most practical banana for gardens that cannot accommodate the scale of a full-sized Cavendish planting. It is widely grown in home gardens across Australia, South Africa, the Mediterranean, Florida, Southern California, Hawaii, and increasingly in the UK and Northern Europe in sheltered, heated conservatories and glasshouses. Container cultivation in large pots of 200 litres or more allows gardeners in genuinely temperate climates to grow Dwarf Cavendish outdoors in summer and move plants under cover during winter, making it perhaps the most versatile edible banana cultivar for non-tropical growers.
Commercially, the Dwarf Cavendish remains significant in specific regional markets even as taller, higher-yielding Cavendish clones have largely displaced it from large-scale export plantation production. The Canary Islands produce approximately 400,000 tonnes of bananas annually — predominantly Dwarf Cavendish — under the protected designation “Plátano de Canarias,” a PDO-certified product prized by Spanish consumers for its richer flavor and smaller, more intensely sweet fruit compared to imported Central American Cavendish. South Africa, Taiwan, and parts of the Mediterranean also maintain meaningful Dwarf Cavendish production for domestic markets, and its enduring popularity as a home garden variety ensures that it remains one of the most planted banana cultivars in the world by sheer number of individual plants, even if commercial tonnage is dominated by its taller relatives.
How to Grow and Care for Dwarf Cavendish Banana
Climate and Site Selection
Dwarf Cavendish grows best in warm tropical and subtropical climates with temperatures between 18°C and 35°C and consistent humidity, but it is more cold-tolerant than most Cavendish types, handling brief dips to around -1°C before suffering pseudostem damage. Select the warmest, most sheltered position in the garden — ideally full sun with protection from prevailing winds, which can shred the large leaves and destabilize the compact plant. In cooler climates, a south-facing wall or glasshouse position significantly extends the range where Dwarf Cavendish can be grown productively.
Soil Preparation
Prepare a deep, well-draining planting site with rich, loamy soil amended generously with compost and aged manure before planting. Dwarf Cavendish demands excellent drainage above all — even brief waterlogging causes rapid root rot and corm collapse that is almost always fatal. In heavy clay soils, raise the planting bed 20 to 30 cm and incorporate coarse sand and organic matter to create a free-draining root environment, and avoid any site where water pools after rain.
Container Growing
Dwarf Cavendish is the banana variety most suited to container cultivation, thriving in large pots of at least 75 to 200 litres filled with a rich, free-draining potting mix of loam, compost, and perlite in roughly equal parts. Container growing allows the plant to be moved under cover during cold winters, making banana cultivation possible in climates as cool as the UK and northern France when plants are overwintered in a frost-free greenhouse or conservatory. Repot into progressively larger containers as the plant grows, and ensure drainage holes are generous and unobstructed.
Planting
Plant Dwarf Cavendish from healthy sword suckers with firm, white corms of at least 45 cm height, sourced from certified disease-free nurseries or clean home garden stock. Set the sucker at a depth of 25 to 30 cm, firm the soil well around the corm, and water deeply immediately after planting to settle the soil and eliminate air pockets. Space garden plants 2.5 to 3 metres apart — slightly closer than full-sized banana varieties given the Dwarf Cavendish’s more compact canopy spread — and apply mulch immediately after planting.
Watering
Water deeply and regularly, providing 25 to 50 mm equivalent per week during active growth, adjusted for local rainfall and temperature. The compact root system of the Dwarf Cavendish can dry out more quickly than that of larger varieties, particularly in containers or shallow soils, so consistent monitoring of soil moisture is important. Drip irrigation at the root zone is ideal, maintaining even moisture without wetting the pseudostem base, where prolonged moisture encourages fungal disease entry.
Fertilizing
Feed Dwarf Cavendish every 6 to 8 weeks with a balanced, nitrogen-rich fertilizer during vegetative growth to support the rapid leaf production that underpins bunch development. As the plant approaches flowering, transition to a high-potassium formula to drive fruit size, flavor, and bunch weight. Container-grown plants deplete nutrients more rapidly than ground-planted specimens and benefit from more frequent, lighter feeding — roughly half the dose at twice the frequency — supplemented with monthly liquid seaweed or fish emulsion applications.
Mulching
Apply a 10 to 15 cm layer of organic mulch — straw, sugarcane trash, or wood chips — in a wide circle around each plant, kept slightly clear of the pseudostem base. Mulch is especially valuable for Dwarf Cavendish in cooler climates, where it insulates the corm and root zone against cold soil temperatures that can check growth or cause cold-induced yellowing of lower leaves. Replenish the mulch layer every 3 to 4 months and add chopped spent pseudostem material back to the mulch ring after harvest to return nutrients to the soil.
Sunlight Requirements
Dwarf Cavendish requires a minimum of 6 hours of direct sunlight daily to grow vigorously and produce fruit, with 8 or more hours producing the best bunch weights and fastest growth rates. In shaded positions, the plant will grow slowly, produce smaller, less vigorous leaves, and may fail to flower and fruit within a reasonable timeframe. If growing indoors or in a conservatory during winter, position the plant in the brightest available spot and supplement with grow lights if natural light is insufficient during the shortest winter days.
Desuckering
Manage the developing mat by maintaining a strict three-generation system — mother plant, one primary follower, and one secondary follower — removing all other suckers promptly as they emerge. Use a sharp, clean spade to cut unwanted suckers at ground level and destroy the growing point to prevent regrowth, channeling the plant’s energy into fruit production rather than vegetative expansion. In container-grown specimens, allow only a single follower sucker to develop alongside the mother plant, as the root volume of a pot limits how many simultaneous plants can be productively sustained.
Flowering and Bunch Management
Dwarf Cavendish typically flowers 9 to 15 months after planting in warm tropical conditions, with cooler subtropical climates extending this to 18 months or beyond. Once all hands have emerged from the flower bract and the male bell is no longer producing new bracts, remove it cleanly about 15 cm below the last hand to redirect photosynthate into fruit swelling. Bag the developing bunch with a perforated blue or clear polyethylene bag to protect fingers from sunburn, wind scarring, and insect damage, and in cooler climates to retain warmth around the bunch and accelerate the final stages of fruit development.
Pest and Disease Management
The most serious threat to Dwarf Cavendish is Fusarium wilt Tropical Race 4 (TR4), a new strain of Panama disease to which all Cavendish varieties — including Dwarf Cavendish — are susceptible, unlike the original Race 1 that spared Cavendish when it devastated Gros Michel. TR4 is spreading globally and has no chemical cure, making prevention through strict biosecurity — clean planting material, no soil movement between sites, and thorough tool sterilization — absolutely critical. Sigatoka leaf disease, banana weevil borer, aphid-transmitted Banana Bunchy Top Virus, and nematodes are additional management priorities requiring regular monitoring, leaf removal, and targeted treatment as needed.
Harvesting
Harvest Dwarf Cavendish bunches when the individual fingers have fully rounded in cross-section and the skin has lightened from deep green to light green or pale yellow-green — typically 80 to 120 days after flowering, depending on temperature. The compact stature of the plant makes bunch removal easier and safer than with taller varieties, often achievable without a ladder by a single person with a sharp knife. Support the bunch weight carefully during cutting to avoid bruising, and hang harvested bunches in a cool, shaded, well-ventilated spot to ripen evenly over 5 to 10 days to full yellow.
Post-Harvest Plant Care
After harvest, cut the spent pseudostem to approximately 1 metre height immediately, then to ground level 2 to 3 weeks later, allowing the plant to redirect stored carbohydrates into the developing successor sucker. Chop the cut pseudostem sections and spread them around the mat as mulch, where they decompose into moisture-retaining, potassium-rich organic matter. Sterilize all cutting tools with dilute bleach between plants, keep the mat area clean of debris that might harbor pests, and apply a fresh layer of compost and mulch around the base to set the successor plant up for a strong, productive growing cycle.