The Balloon Flower, scientifically known as Platycodon grandiflorus, is a charming and distinctive perennial plant belonging to the bellflower family, Campanulaceae. Native to East Asia — including China, Japan, Korea, and eastern Siberia — it has been cultivated in gardens for thousands of years and remains a beloved ornamental plant worldwide. Its common name perfectly describes one of nature’s most delightful pre-bloom displays: the buds puff up into perfectly round, balloon-like spheres before dramatically splitting open into wide, star-shaped flowers, a spectacle that never fails to delight both children and adults alike.
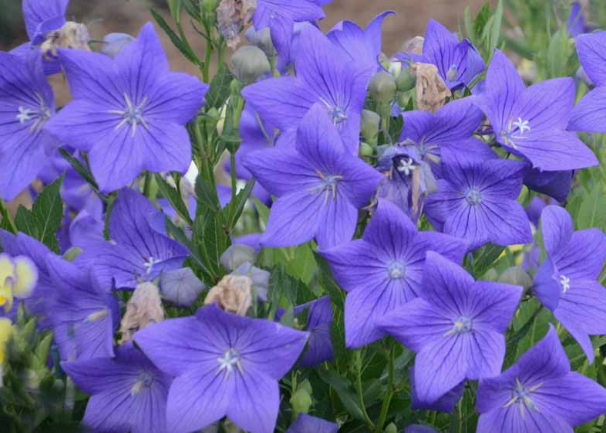
The flowers of Platycodon grandiflorus are truly striking in appearance. They are broadly bell-shaped to saucer-like, with five distinct petals that are fused at the base and often decorated with delicate purple veining. The classic color is a deep violet-blue, but cultivated varieties are also available in white, pale pink, and soft lavender. The blooms measure two to three inches across and are held upright on sturdy stems above the foliage. Flowers appear from midsummer through early autumn, providing a welcome burst of color during a period when many other garden perennials begin to fade.
One of the most appealing qualities of the Balloon Flower as a garden plant is its compact, well-behaved growth habit. Most varieties grow between one and two and a half feet tall, making them ideal for the front to middle sections of a perennial border. Dwarf cultivars are also available, reaching as little as six inches in height, and these work beautifully in rock gardens, container plantings, and edging arrangements. The foliage is neat and attractive, with lance-shaped, bluish-green leaves that have slightly serrated margins, providing visual interest even when the plant is not in bloom.
Beyond its ornamental value, the Balloon Flower has a long and meaningful history in traditional Asian medicine. In China and Korea, the thick, fleshy taproot — known as doraji in Korean — has been used for centuries to treat respiratory ailments such as coughs, bronchitis, and sore throats. The root contains bioactive compounds called platycodins, which are believed to have expectorant and anti-inflammatory properties. In Korean cuisine, the young roots are eaten raw in salads or cooked in traditional dishes, giving the Balloon Flower a cultural and culinary significance that extends well beyond the garden.
The Balloon Flower is notably long-lived and remarkably low-maintenance once it is established in the garden. As a hardy perennial, it reliably returns each year from its deep taproot, often becoming more vigorous and floriferous with each passing season. It is cold-hardy to USDA Zone 3, tolerating winters that drop to -40°F (-40°C), which makes it one of the tougher ornamental perennials available to gardeners in cold climates. It has very few pest or disease problems, and deer and rabbits tend to leave it alone, making it an excellent choice for gardens where wildlife browsing is a concern.
In the contemporary garden, the Balloon Flower has earned a reputation as a plant of exceptional versatility and reliability. It pairs beautifully with other summer perennials such as coneflowers, black-eyed Susans, and daylilies, and its cool blue-violet tones provide a calming contrast to warm-colored companions. Cut flowers last well in arrangements, and the unique balloon buds add an eye-catching touch to bouquets. The plant’s tolerance for a range of soil conditions, its long blooming season, its hardiness, and its undeniable charm at every stage of development from bud to bloom make the Balloon Flower a truly exceptional addition to any garden setting.
Also Read: How To Grow Shasta Daisy From Seeds
How to Grow Balloon Flower from Seed
- Start seeds at the right time. Begin seeds indoors 8–10 weeks before the last expected frost date in your area, or direct-sow outdoors in spring once soil temperatures consistently reach at least 60°F (15°C). Starting early indoors gives plants the best chance of blooming in their first year.
- Cold-stratify the seeds for better germination. Although not always strictly necessary, placing seeds in a damp paper towel inside a sealed plastic bag in the refrigerator for 2–4 weeks before sowing can significantly improve germination rates by mimicking the natural cold period the seeds would experience in the wild.
- Use a fine, well-draining seed-starting mix. Fill shallow trays or small cells with a light, sterile seed-starting medium. Avoid using regular garden soil, which is too heavy and may harbor pathogens that can harm delicate seedlings.
- Surface-sow the seeds — do not cover them. Balloon Flower seeds are very tiny and require light to germinate. Press them gently onto the surface of the moistened mix and do not cover them with soil. Simply pressing them lightly into contact with the medium is sufficient.
- Mist gently and thoroughly after sowing. Use a fine misting bottle to water the seeds after sowing, keeping the surface evenly moist without washing the tiny seeds away or causing them to clump together in one area.
- Cover trays to retain moisture. Place a clear plastic dome, a sheet of cling wrap, or a piece of glass over the seed tray to maintain high humidity around the seeds. This prevents the surface from drying out too quickly, which is critical for the tiny seeds to germinate successfully.
- Provide the right temperature for germination. Balloon Flower seeds germinate best at soil temperatures between 65–75°F (18–24°C). Place trays in a consistently warm location such as the top of a refrigerator, a heat mat, or a warm windowsill to maintain this temperature range.
- Be patient and watch for sprouting. Germination typically takes 14–21 days under ideal conditions, though it can take a little longer. Do not be discouraged if sprouts appear slowly — Balloon Flowers are known for somewhat irregular germination timing, and staggered sprouting is quite normal.
- Remove the cover once seeds sprout. As soon as the majority of seedlings have emerged, remove the plastic cover to improve air circulation. Leaving the cover on too long after germination encourages damping-off disease, which can quickly devastate young seedlings.
- Provide ample light for strong seedling growth. Move seedlings to a bright location with at least 6–8 hours of light daily, or place them 2–3 inches beneath fluorescent or LED grow lights for 14–16 hours per day. Insufficient light causes tall, spindly seedlings that struggle after transplanting.
- Water carefully at the base. Once seedlings are growing, water at the base of the plants rather than overhead. Balloon Flower seedlings are susceptible to fungal issues, and keeping the foliage dry reduces the risk of disease significantly.
- Fertilize lightly once true leaves appear. When seedlings develop their first set of true leaves — as opposed to the initial seed leaves — begin feeding them with a diluted, balanced liquid fertilizer at half strength once every two weeks to support steady, healthy growth without over-stimulating tender roots.
- Pot up seedlings with care. When seedlings are large enough to handle, transplant them into individual 3–4 inch pots. Handle them by their leaves rather than their fragile stems, and be especially gentle with the taproot, which is sensitive to damage and does not regenerate easily if broken.
- Harden off seedlings gradually before outdoor planting. About 10–14 days before transplanting outdoors, begin placing seedlings outside in a sheltered, partially shaded spot for a few hours each day, gradually increasing their exposure to direct sunlight and outdoor temperatures to avoid transplant shock.
- Choose the right planting location. Select a site with full sun to partial shade and well-draining soil. While Balloon Flowers tolerate partial shade, they tend to produce the most abundant blooms in a location that receives at least 6 hours of direct sunlight daily. Avoid low-lying areas where water pools, as the taproot is prone to rotting in soggy conditions.
- Be patient with first-year plants. Balloon Flowers are slow to establish, and first-year plants grown from seed may produce only modest blooms or none at all in their debut season. Do not pull them — with each passing year, the plant’s root system deepens and strengthens, and by the second and third years it will reward your patience with an increasingly impressive and generous display of its signature balloon buds and star-shaped flowers.
Also Read: How To Grow Okra From Seeds