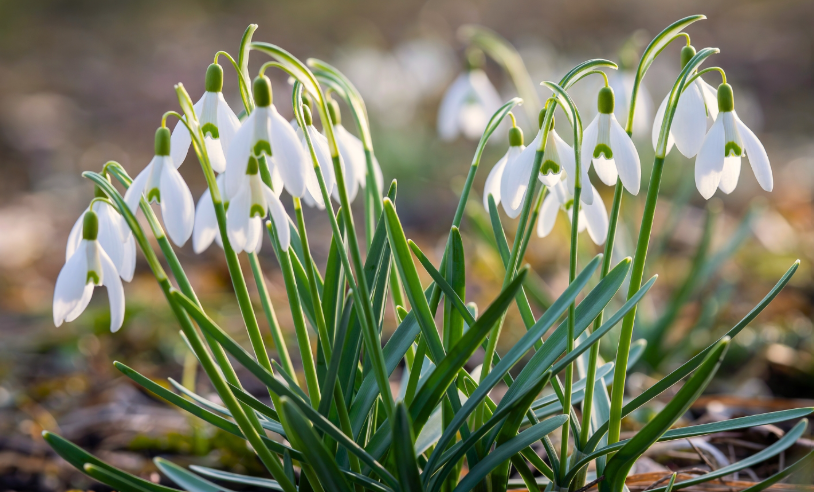
Snowdrop (Galanthus nivalis) is a small bulbous perennial belonging to the amaryllis family, native to woodlands and meadows across Europe and parts of the Middle East. As a plant, it produces narrow, strap-like grayish-green leaves that emerge directly from the bulb, typically reaching just 4 to 6 inches (10 to 15 centimeters) in height. Each bulb sends up one or two slender flower stems, giving the plant a delicate, understated appearance.
The flowers are small, nodding, and bell-shaped, consisting of three larger outer petals and three smaller inner petals often marked with green. These blooms appear in pure white, hanging gracefully from thin stems that sway gently in late winter breezes. Despite their fragile look, the flowers are remarkably resilient against cold and even light snow.
Snowdrops are famous for being among the very first flowers to bloom each year, often pushing through frozen or snow-covered ground in late winter to early spring. This early appearance has made them a cherished symbol of hope and the approaching end of winter in many cultures.
The plant naturally spreads through bulb division and self-seeding, gradually forming dense colonies known as drifts when left undisturbed. Over time, a single planting can multiply into a substantial carpet of white blooms beneath trees and shrubs.
Snowdrops thrive in USDA zones 3 through 7, where cold winters provide the chilling period necessary for proper flowering. They are particularly well-suited to woodland gardens, where dappled shade from deciduous trees mimics their natural habitat.
This plant is most commonly used for naturalizing in lawns, beneath deciduous trees, and along woodland paths, where its early blooms provide welcome color before most other plants have emerged. Its small size also makes it suitable for rock gardens and container displays.
While individually modest in size, snowdrops create a powerful visual impact when massed together, transforming dull late-winter landscapes into scenes of delicate white color. Their reliability and early bloom time have secured their place as a beloved garden staple for centuries.
Also Read: How To Grow Snowdrop From Seeds
How to Grow Snowdrops From Bulbs
- Source Healthy Bulbs: Choose firm, plump bulbs free from soft spots, mold, or visible damage when purchasing from a supplier. Larger bulbs generally establish faster and produce blooms sooner than smaller ones. Avoid bulbs that appear dried out or shriveled, as these may struggle to establish.
- Plant Bulbs Promptly After Purchase: Snowdrop bulbs deteriorate quickly if left unplanted, unlike many other bulb types that store well. Planting within a few days of receiving bulbs significantly improves success rates. If immediate planting isn’t possible, keep bulbs cool and slightly moist.
- Choose a Partially Shaded Planting Site: Select a location with dappled or partial shade, ideally beneath deciduous trees or shrubs. This mimics the woodland conditions snowdrops naturally favor. Morning sun with afternoon shade also works well in most climates.
- Prepare Humus-Rich, Well-Draining Soil: Work compost or leaf mold into the planting area to improve both moisture retention and drainage. Snowdrops dislike soil that becomes waterlogged for extended periods. Loose, crumbly soil allows roots to establish quickly.
- Plant at the Correct Depth: Bulbs should be planted about 3 inches deep, or roughly three times the height of the bulb itself. Planting too shallow can leave bulbs vulnerable to frost heave and drying out. Planting too deep may delay or reduce flowering.
- Position Bulbs with the Pointed End Up: When planting, orient bulbs so the pointed tip faces upward and the flatter root end faces down. If the orientation is unclear, planting on its side generally still allows the shoot to find its way up. Careful placement helps ensure even, upright growth.
- Space Bulbs for Natural-Looking Drifts: Plant bulbs in loose, irregular groups of 25 or more rather than straight rows for a natural appearance. Space individual bulbs about 2 to 3 inches apart to allow room for future multiplication. Randomly scattering bulbs before digging holes can help achieve a natural layout.
- Plant in Early Fall for Best Results: Autumn planting gives bulbs time to establish roots before winter dormancy sets in. This timing aligns with the bulb’s natural growth cycle and supports strong spring blooming. Planting too late in the season can reduce first-year flowering.
- Water Thoroughly After Planting: A deep watering immediately after planting helps settle soil around the bulbs and eliminates air pockets. This initial watering encourages root development before the ground cools further. Subsequent watering can rely largely on natural rainfall.
- Mulch Lightly Over Planted Bulbs: A thin layer of leaf mold or compost mulch helps insulate bulbs and retain soil moisture through winter. This also replicates the natural leaf litter found in woodland habitats. Avoid piling mulch too thickly, which could smother emerging shoots.
- Avoid Disturbing Bulbs After Planting: Once planted, bulbs should be left undisturbed to establish their root systems undisturbed through the dormant season. Marking the planting area helps prevent accidental digging nearby. Patience during this period supports strong first-year growth.
- Expect Blooms the Following Spring: Unlike seed-grown plants, bulbs planted in fall typically produce flowers the very next spring. This makes bulb planting the faster route to an established display. Bloom size and quantity often improve in subsequent years as bulbs settle in.
- Allow Foliage to Die Back Naturally: After flowering, leave the foliage in place until it yellows and withers on its own. This period allows the bulb to store energy for next year’s growth and flowers. Removing leaves too early weakens the bulb significantly.
- Divide Established Clumps for Propagation: After a few years, clumps can be divided shortly after flowering, while still “in the green,” to create new plantings. Carefully separate bulbs and replant them promptly in prepared soil. This is one of the easiest ways to expand a snowdrop collection.
- Protect Bulbs from Pests After Planting: Rodents and other digging animals occasionally disturb newly planted bulbs before they establish. Wire mesh laid over planting areas can deter digging without harming the bulbs. This protection is most important during the first season.
- Monitor Growth in Early Spring: Once shoots emerge in late winter or early spring, check that growth appears healthy and unobstructed by debris or compacted mulch. Clearing excess debris allows flowers to open properly. Healthy first-year growth is a good indicator of successful establishment.
Also Read: How to Grow and Care for Snowdrop